Synapses
In Simbrain, synapses, also known as weights, exist either as loose synapses or within synapse groups. This pages describes general synapse properties, the synapse dialog, and how to edit loose synapses.
Loose synapses are represented by a colored semicircle. The size of the semicircle is proportional to how far the synaptic strength is between 0 and its upper or lower bound. The exact strength can be determined by lingering over a synapse or double clicking on it. The color of a synapse represents whether the strength is: greater than 0, red; less than 0, blue; or equal to 0, white. The last case represents, as it were, the absence of a weight. These conventions can be adjusted in the preference dialog.

Common Synapse Properties
These are properties common to all synapses, regardless of type. All of them have some reflection in the GUI interface, but some of them only matter to the GUI interface (e.g. increment). For some synapses, upper bound and lower bound does not have a significant role other than to limit how large the graphical representation of the synapse can be.
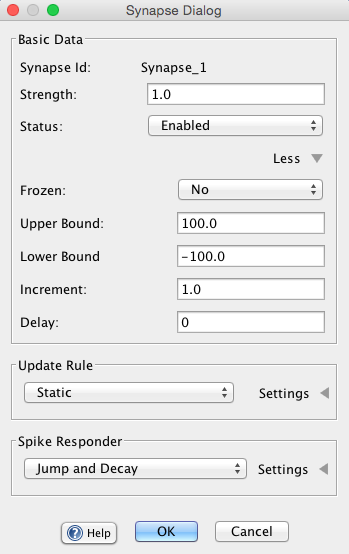
Strength: The strength is how "strong" this synapse is. This is represented by the size of the weight. Once a synapse has been selected, strength can be incremented by the up and down arrows or can be randomized.
Enabled / Disabled: An enabled synapse operates as usual, transmitting information from a source neuron to a target neuron. If disabled the synapse will no longer do this. Functionally, the synapse does not exist.
Frozen / Unfrozen: If frozen, a synapse's strength will not be changed by learning. Local synapse update rules won't be called when the network is updated, and supervised learning is also prevented from adjusting synapses. Compare clamping in neurons. Note: However, a frozen synapse's strength can still be set externally, via the keyboard and input tables.
Upper Bound : This field plays different roles depending on the type of the synapse, but in general it determines the maximum strength of a weight. It also determines the range of colors which a neuron can take on. This, along with the lower bound field, determines the bounds of randomization.
Lower Bound : This field, like the upper bound, plays different roles depending on the type of the synapse, but in general it determines the minimum strength of a weight. It also determines the range of colors which a neuron can take on. This, along with the upper bound, determines the bounds of randomization.
Increment: The increment field sets the amount that a synapse is incremented when it is manually adjusted. For example, if increment is set to .1, then each time the up arrow is pressed the synapse will increase its strength by .1.
Delay: A positive integer that delays how many iterations, or time-steps, must occur before the pre-synaptic signal, or the activation of the pre-synaptic neuron, is delivered.
Quick Keyboard Adjustment of Synapse Properties
By selecting a set of weights (e.g. by pressing "w", or by lassoing over a group of lines) and pressing certain buttons, those weight's properties can quickly be adjusted.
Increment / Decrement: Press the up and down buttons to adjust synapse strengths. If the up key is pressed, the increment amount of a given synapse is added to the current strength. The size of the weight should be visibly changing. Similarly for the down key.
Randomize: Press the "r" key or the "dice" button on the toolbar to randomize all selected synapses.
Clear: Press the "c" key or the "eraser" button on the toolbar to set the strengths of all selected synapses to 0.
Synapse Dialog / Editing Synapses
More detailed adjustments parameters can be adjusted using the synapse dialog. The dialog contains several sections, including a section for adjusting common synapse properties, described below, a section specific to the synapse update rule (these parameters are discussed in the relevant sub-pages), and a section for setting spike responders, if any.
The synapse dialog can be invoked in the following ways:
Setting single synapses: To set a single synapse, double click or right click on it and select set properties. Since synapses are relatively small, you can either zoom in or lasso the synapse of interest.
Setting multiple synapses: To set multiple synapses, select more than one synapse, and either double click on one of the synapses you have selected, or select set properties from the popup or network menu. A dialogue box pertaining to multiple synapses will appear. If the selected synapses are of different synapse types, only the common properties appear. Consistent properties are shown as normal, while inconsistent properties have "..." in the text box. Any changes, including changes to the fields where parameters have been marked as inconsistent, are applied to all of the selected synapses.
Popup Menu (Selected Synapses)
When right clicking on a synapse a popup-menu appears whose actions will usually apply to selected synapses. Most of these actions are described in the menu documentation. The following actions only appear in the popup menu:
Send Scalar Coupling To: Creates a coupling such that this synapse's strength is forwarded to some other scalar consumer in Simbrain, e.g. a time-series graph. See the couplings page.
Receive Scalar Coupling from: Creates a coupling such that this synapse's strength is set by the value of some other scalar producer in Simbrain.