Connecting Neurons
Video instruction on connecting neurons is here (6:36 in the building networks video).
Perhaps one of the most essential parts of building a network aside from creating the neurons is connecting those neurons to other neurons (and sometimes the same neurons). Connections embody the GUI component of synapses in Simbrain, and therefore graphically allow the one to manipulate the parameters of the synapses connecting one set of neurons to another. In addition to granting access to underlying synapses, connections and their related GUI components allow one to determine the topology of how (out of a multitude of ways) one set of neurons can connect to another. In the side menu are pages dedicated to each of the standard ways neurons can be connected in Simbrain.
The quick and easy way to connect loose neurons is with the quick 1 2 method!
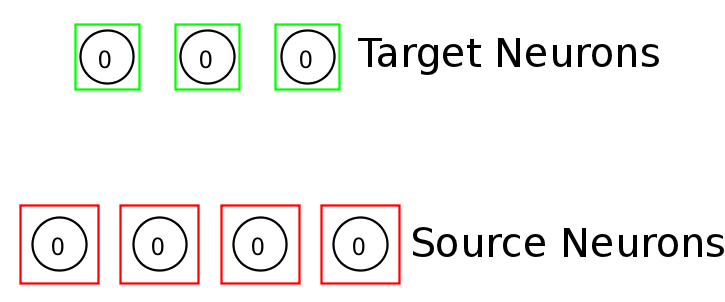
Various commands in Simbrain (e.g: connecting nodes, training weights, viewing weight matrices) require you to specify a set of source and target neurons (or neuron groups). Source neurons are surrounded by red squares and target neurons are surrounded by the standard green selection squares. Here is an example.
The same ideas and visual conventions apply to neuron groups, which can be selected via their interaction boxes and connected with synapse groups.
The main actions required to set up source and target neurons are as follows:
To set source neurons: select a group of neurons and either (1) press the "1" key, (2) right click and select Connect > Set Source Neuron(s), or (3) use the Edit menu and select Connect > Set Source Neuron(s).
To set target neurons: simply select neurons as usual.
To clear all source neurons: unselect all neurons (by clicking outside of any neuron), and (1) press the "1" key or (2) right click and select Connect > Set Source Neuron(s), or (3) use the Edit menu and select Connect > Set Source Neuron(s).
To clear specific source neurons: select the neurons of interest and (1) right click and select Connect > Clear Source Neuron(s), or (2) use the Edit menu and select Connect > Clear Source Neuron(s).
Note that when creating recurrent connections the same neurons will be both sources and targets.
Main Connection Methods
Neurons can be connected by synapses in several different ways:
The Quick Keyboard 1-2: Select source neurons, designate them as source by pressing "1", select target neurons, and connect (all to all) by pressing "2". Repeat as needed to connect series of neurons. This tends to be easy to get the hang of, and once the commands are familiar, many neurons can be quickly connected in this way.
Menu Commands: Sam as the keyboard 1-2 but using the relevant menu commands to set as source and make the connections.
Connection Objects: At the point that a connection is made using the "2" button, one can opt to create a special type of set of connections (not just all to all), and can also customize what the synapse strengths will be, using one of the built-in connection objects. See the pages in the sub-menu above.
Scripts: Highly customized connections (e.g. those used in the cortical branching script) can be created using scripts.
Editing Connections
Synapses are usually created as simple excitatory synapses with no special properties. Once created, synapses can be edited by double-clicking or using the synapse adjustment panel. Synapses in synapse groups have a complex suite of tools for viewing and customizing.
View Connections as a Weight Matrix
See weight matrix viewer documentation.